Sunday, August 11, 2013

Building a Chicken Coop

So we haven't been impressed with the suburban use of a tiny little chicken tractor. It houses them just fine, but it's a bear - and this is more because of the way I made it than the idea of a tractor - to fill the food and water.

When we added a couple more chickens, we realized it's time for a real chicken coop.
So this is the place where we're going to build the coop. We're clearing space in what was once a fairly unruly garden.

Laying out bricks for a foundation. These were part of our fireplace at one time.


While Milady was preparing the area and laying out the foundation, I was building the base of the coop.

First: I laid out the perimeter with treated 2x4s. These will set on top of the bricks. 

I reinforced the corners.


Then I installed treated 2x4s vertically on the perimeter.


Here's a close-up of the corner's construction.

And the wooden base installed on top of the brick foundation.

If you look closely, you'll see a layer of chicken wire dangling from the bottom of this base.
Here's the closeup: the chicken wire was about 12" wide. We buried it in the dirt around the coop. This is designed to discourage whatever creatures wish to dig under the foundation to get at the Ladies.
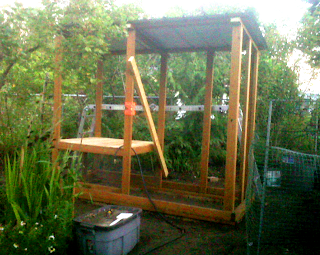
Then we set up the studs.

The orange gizmo is a level to help me identify "vertical." It doesn't go there automatically.


Getting a start on the frame for the roof.


We're planning an exit on the end, under the coop itself, to let the chickens in and out. We have odd ideas for this, involving a "chicken tunnel" to another area for them to roam.


Getting the screen up under the coop. Milady does details so much better than I.


 And we have a roof up.


First wall is up.


Time to make a floor.

A good floor will be easy to clean. For this coop, that means linoleum. I've glued it on, and now I'm applying pressure the best way I know how.


Nicest linoleum floor around. Nicest floor in a chicken coop we know of.

There is a drawback. We've since found out that if they're tweaking out about something, then the pine shavings on the linoleum is awfully slippery. Several of them fell on their feathered little kiesters when they first arrived.

It was really funny, actually. I tried not to laugh. I failed.


Second wall is up. This one has the nesting boxes sticking out.

Nesting boxes protruding out of the coop is traditional for a couple of reasons:
  • It keeps the birds from roosting (and pooping) on the nests or nesting boxes.
  • It makes it much easier to get at the eggs: don't have to go into the coop. 
  • It looks kind of cool.
Nest boxes will get a divider and a lid soon.


Got a lid on the nest box. Had an inspiration to seal the joint with a piece of innertube.

Looks kind of glorious here, doesn't it? 
And got the inside wall finished. Got a door for chickens. Studies have shown that chickens like doors.


Time for a door. The best way is to make our own.


Beginning to hang the door. Actually, the door is hung, but there is not yet a door frame. That's next.


Now we need a cleanout door on the back of the coop. We wanted the boards to match the rest of the wall, so we built the entire wall, and then cut the door out.


The semi-final coop. "Semi" only because there are some details I need to finish, but the Ladies moved in this afternoon.

Whew!


The old coop, withe the pen now removed, looks a little forlorn.

Since it fits the raised beds, we might use it for a "mobile office" for the Ladies in the off-season.

Or we might sell it next spring and "re-coop" some of the costs of building the big one.


Needed to block the nest boxes off. They were fighting over who got to sleep there.

"No, girls. Those are for laying eggs, not for sleeping and pooping in."
So we needed to pick up the ladies and set them upon the roosts for the first night. They squawked (like chickens!) when we lifted them up, but they seemed to like it up there.

Monday, August 5, 2013

A Few Fruits

Been running so fast, haven't had much time to post.

Peppers are coming in. This monster red pepper came from a tiny little pepper plant. But it poured its heart into this one, epic pepper. 
Begun the tater harvest. I realized a mistake I made in planting, but not until after planting: I needed to let the seed taters actually sprout before planting. I planted taters too fast.

This is 2 of 5 tater towers (plus another pot), so maybe a third of the tater harvest. I hope the others do better.
This is an awesome year for squashes! This was a little more than one day's harvest.

The orange things are a Japanese pumpkin (and a yummy one!) that we discovered in Germany. We've barbecued (like zucchini) slices when they're young. Probably steam or bake the more mature ones.

And zukes, pattypan, yellow crookneck. Also a couple of tiny orange peppers.


I already reported on the garlic & onion harvest. I'll be harvesting the red onions soon. And I'll have to take pictures of the kale trees soon. 

Wednesday, July 31, 2013

Chicken Population Growth

The population of our chicken coop has grown.

The three original ladies (back to front: Clueless, Lady Lazarus ["Lazzie"], and Princess) have some new housemates (coop-mates?).

Lazzie is a Silver-Laced Wyandotte, which means tan eggs. The white ones are Leghorns. White eggs, but lots of them; possibly as many as the other three combined.


The new girls (Duchess and Lady, left and right) are Barred Rocks, a variation of Plymouth Rocks. They'll give us plenty of brown eggs. In fact, someone has said that most brown eggs available commercially come from Barred Rocks.

We have some room for growth in the "Welcoming our guests" category.

Sunday, July 28, 2013

Smudge Pot for Skeeters

I'm a writer, so (not surprisingly), I spend a fair bit of time writing.

I'm also an outdoorsman, so (also not surprisingly), I spend a fair bit of time outdoors.

And I often combine the two: I spend quite a lot of time outdoors, writing. The picnic table is an ideal place for writing. Except for one detail.

There is a drainage pond not far away, and therefore, when the sun goes down, the mosquitoes come roaring out of the shadows, intent on blood.

I've noticed that when I have my pipe lit up, the mosquitoes are kept at bay. But that's not the reason I want to smoke a pipe, and frankly, I don't want to smoke a pipe every time I'm writing at the picnic table.

So I created a little gizmo to smoke the pipe for me. Deep in a hanging planter pot is an oil lamp (with citronella oil). Above it is a small grille with a tiny metal pot, and I load the pot with pipe tobacco.

It's not a magic wand. And it works better when it's on the table nearby, rather than hanging over there from the ceiling. But it certainly is interesting. And it certainly does help!

Newspaper in the Garden

I've found the perfect use for the Sunday newspaper.

I'm killing grass between the raised beds. Several layers of newspaper, with garden dirt on top.

I'll cover it with cedar chips when things calm down a little.

Saturday, July 20, 2013

Awesome Rhubarb Sauce and Syrup

Ridiculously good. Ridiculously easy. And a really good way to make use of all that rhubarb! We've harvested ours three times so far this year, and I expect two or three more before it's done.

Ingredients for a modest batch of either the syrup or the sauce:

3 or 4 cups of chopped fresh (or frozen) rhubarb
1 cup filtered water
¾ cup sugar 

This makes a pretty tart final product, which is good over homemade vanilla ice cream or as an ingredient in barbecue sauce.
For a sweeter version, use 1 cup sugar. This one is great as a snack by itself or over granola and such as a breakfast.

Load it into a saucepan. Bring it to a boil, then lower it to a simmer, and let it go for a while. You can get by with as little as 20 minutes: just enough to break down the rhubarb into a very nice sauce. 

I prefer to let it simmer for another half an hour or more: it breaks down even more, of course, but more importantly, it reduces the mixture and the flavor is deeper and richer. If you turn up the heat a little and let it caramelize, it's another world of flavor.

If you're looking for rhubarb sauce, then you're done. Serve it hot over ice cream, or cool it in the fridge for use on granola, yogurt, or cottage cheese. Or just eat it by itself (you'll want the sweet one for this!)

If you're looking for rhubarb syrup, then strain the hot sauce through a fine strainer. After it's sat and drained (it's not fast), the resulting pulp will still be wet: this is also yummy. I might try swirling some of that residue, perhaps with some crushed Nilla Wafers, in freshly homemade ice cream for a new & different treat.

I'll be using the syrup in barbecue sauces, cocktails, maybe over ice cream. Mm mmm.

Monday, July 15, 2013

Second Crop of Peas

Pulled all the peas out today.

I'm told that we can grow a second crop. I planted some sugar snap-type goodies.

In the meantime, the pattypan squash and the cucumbers nearby will get some good sunshine.

We'll see how this goes.